Monday 22 January 2024

CodeIgniter generating too many sessions files | Resolved and remove session in cron job


Normal Approach


First setup you have to know where your php.ini file is.


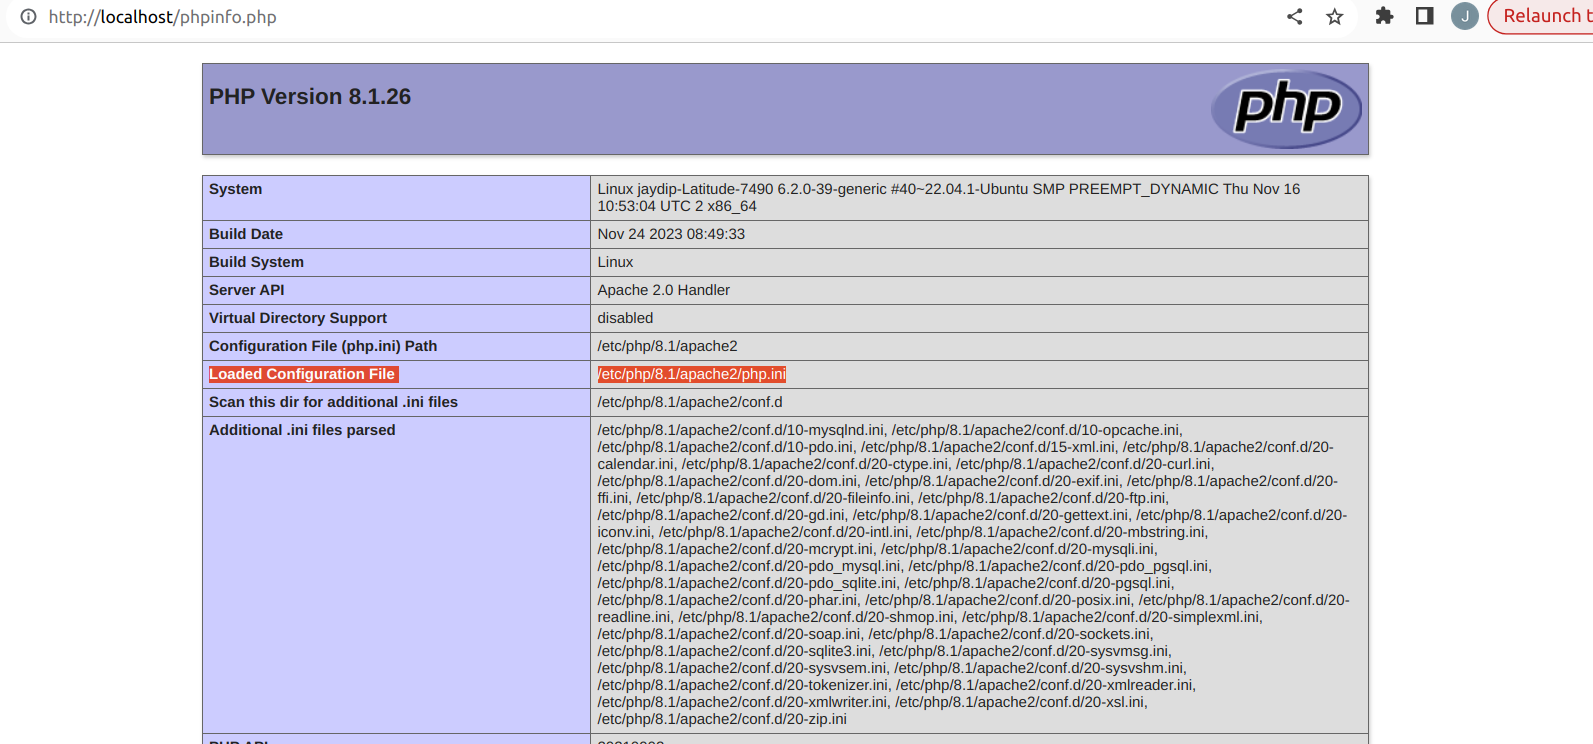
-For this you have to know using phpinfo(); function to know where the php.ini path is.

Here is a screenshot for where the php.ini file path you get.


Find below variable and change it


session.gc_probability = 1
session.gc_divisor = 1000
session.gc_maxlifetime = 7200


In the codeigniter config.php  file  change this.

In this create session folder with writable


$config['sess_driver'] = 'files';
$config['sess_cookie_name'] = 'mysession';
$config['sess_expiration'] = (60 * 60);
$config['sess_save_path'] = FCPATH . "sessions";
$config['sess_match_ip'] = FALSE;
$config['sess_time_to_update'] = 300;
$config['sess_regenerate_destroy'] = TRUE;


First create folder using mkdir command  : mkdir sessions 

After change this folder user permission  : sudo chown -R www-data:www-data sessions/


In this if you have set $config['sess_save_path'] = null then it store in
/var/lib/php/sessions folder.


This solution sometimes works or sometimes not.


Emergency approach to remove session file


1)sudo find /var/lib/php/sessions/. -type f|wc -l


  -this command give you count of your current session


2)cd /var/lib/php/sessions and fire du -sh then it's
Give size of you session file
But you have to go for cd /var/lib/php/sessions you to become
Root user for this you have to use sudo su


1)sudo su
2)cd /var/lib/php/sessions
3)du -sh


After fire below command for remove all session in projects

But please be aware if you remove the session folder so that time web site session is not working.


Follow step by step Command


1)sudo rm -rf /var/lib/php/sessions
  -remove session folder


2)
cd /var/lib/php
mkdir sessions


3)sudo chmod -R 1733 sessions/


This is useful when you have so many session files and because the

server is full at that time you can clear the session's folder size.


Crontab Approach  


In this we can remove session file using name or all file 


So  in this we have create both


1)Remove all session file with cronjob


1.1 this command use current folder session count
 
    sudo ionice -c 2 nice -n 19  find /var/lib/php/sessions  -type f  | wc -l


1.2 this command use for count session file current time to 72 hours

sudo ionice -c 2 nice -n 19  find /var/lib/php/sessions  -type f -cmin +4320 | wc -l


In this we have set -cmin +4320 this means current time 4320 before file count

You can change as per your requirements.

ionice -c 2 nice -n 19 This is useful for checking server memory and priority 

We have set server best effort and nice -n 19 last priority


This command description
  The command you provided is a combination of several commands in a Unix-like operating system. Let's break it down:

The command you provided is a combination of several commands in a Unix-like operating system. Let's break it down:

  • sudo: This command is used to execute subsequent commands with superuser

  • privileges.

  • ionice -c 2: This sets the I/O scheduling class for the command. In this case, it sets

  • the I/O class to 2, which corresponds to the "idle" class. This means that the command

  • will have low I/O priority.

  • nice -n 19: This sets the process priority for the command. A lower priority value

  • (more negative) means higher priority, but in this case, it sets the process priority to the

  • lowest possible value, 19. This means the command will have very low CPU priority.


  • find /var/lib/php/sessions -type f -cmin +4320: This is the find command that

  • searches for files (-type f) in the specified directory (/var/lib/php/sessions) that

  • were changed more than 4320 minutes ago (-cmin +4320).

  • |: This is a pipe symbol, which is used to pass the output of one command as the input

  • to another.

  • wc -l: This command is used to count the number of lines in the input it receives. In

  • this case, it counts the number of files found by the find command.

So, the entire command is searching for files in the specified directory that were

changed more than 4320 minutes ago, and then it counts the number of such files.

Keep in mind that running commands with elevated privileges (sudo) and modifying

system files or settings can have significant consequences. Make sure you understand

the commands and their implications before executing them.


2)Remove all session with timeout and without time out


  1. sudo su

  2. crontab -e

      3)  set cron using below


  05 05 * * * ionice -c 2 nice -n 19 find /var/lib/php/sessions -type f -cmin +4320 -exec sudo rm {} \;


This command run on 5:05 am and remove session file before 72hour (4320/60 = 72)


Some time so many session file so at that time not remove session file 24 hour so 

At time some time override our cron for that i have suggest you can set timeout 

In cron so after that time cron is automatically closed.

So i have run cron for 20h duration please check below example


05 05 * * * /usr/bin/timeout 20h sudo ionice -c 2 nice -n 19 find /var/lib/php/sessions -type f -cmin +4320 -exec sudo rm {} \;


/usr/bin/timeout 20h - > you can set timeout in minutes , hours and seconds


For example you have to set for 5 minutes then you can set link this

/usr/bin/timeout 5m


3)Remove all session with timeout and without time out by name


  1. sudo su

  2. crontab -e

      3)  set cron using below


1)without timeout
05 05 * * * ionice -c 2 nice -n 19 find /var/lib/php/sessions -type f -name 'session_name*' -cmin +4320 -exec sudo rm {} \;
-type f -name 'session_name*' -> this is find file from session folder and remove particular this file


2) timeout

05 05 * * * /usr/bin/timeout 20h sudo ionice -c 2 nice -n 19 find /var/lib/php/sessions -type f -name 'session_name*' -cmin +4320 -exec sudo rm {} \;


/usr/bin/timeout 20h - > you can set timeout in minutes , hours and seconds


Monday 6 November 2023

Mysql Best way import and export data using mysql command line in Linux.

Your provided commands demonstrate how to perform a MySQL database dump and import. Here's a breakdown of each command:


1. *Database Dump:*

bash

mysqldump -u DBUSERNAME -p DBPASSWORD DATABSENAME --single-transaction --quick | ionice -c2 -n 7 tee > test.sql


Explanation:

- `mysqldump`: This command is used to create a backup of a MySQL database.

- `-u DBUSERNAME`: Specifies the username to connect to the MySQL server.

- `-p DBPASSWORD`: Prompts for the password of the MySQL user specified by the `-u` option.

- `DATABSENAME`: Specifies the name of the database to dump.

- `--single-transaction`: Ensures that the entire dump is made in a single transaction, ensuring data consistency.

- `--quick`: This option is used for quicker dumping of the data by retrieving rows from the server a row at a time rather than retrieving the entire result set at once.

- `| ionice -c2 -n 7 tee > test.sql`: Pipes the output of `mysqldump` to `ionice` and `tee`. `ionice` is used to set the I/O priority of the process, and `tee` is used to redirect the output to both the terminal and a file named `test.sql`.


2. *Database Import:*

bash

ionice -c 2 -n 7 mysql -u DBUSERNAME -p DATABSENAME < /home/jaydip/Downloads/database/test.sql


Explanation:

- `ionice -c 2 -n 7`: Sets the I/O priority of the subsequent command.

- `mysql`: This command is used to import SQL files into a MySQL database.

- `-u DBUSERNAME`: Specifies the username to connect to the MySQL server.

- `-p DATABSENAME`: Prompts for the password of the MySQL user specified by the `-u` option.

- `< /home/jaydip/Downloads/database/test.sql`: Redirects the contents of the `test.sql` file to the `mysql` command, which then executes the SQL commands to import the data into the specified database.


These commands should effectively create a dump of your MySQL database into the `test.sql` file and then import that dump back into the database specified by `DATABSENAME`. Make sure to replace `DBUSERNAME`, `DBPASSWORD`, and `DATABSENAME` with the appropriate values for your MySQL setup.

Tuesday 29 March 2022

How to install Switch Between Composer Version 1 and 2 in ubuntu

 How to install Switch Between Composer Version 1 and 2 in ubuntu

Install Composer

Link for reference : Download Link

-> Hits below command in open ubuntu terminal

php -r "copy('https://getcomposer.org/installer', 'composer-setup.php');"


php -r "if (hash_file('sha384', 'composer-setup.php') === '906a84df04cea2aa72f40b5f787e49f22d4c2f19492ac310e8cba5b96ac8b64115ac402c8cd292b8a03482574915d1a8') { echo 'Installer verified'; } else { echo 'Installer corrupt'; unlink('composer-setup.php'); } echo PHP_EOL;"


php composer-setup.php


php -r "unlink('composer-setup.php');"

->install composer globally hit below command

Command hits : sudo mv composer.phar /usr/local/bin/composer

->check composer version

Command hits : composer

Switching Versions

you can change the version using composer self-update command. 

if you want to switch composer 1 to composer 2 then you can hits below command

Hit command Name: composer self-update --2

if you want to switch composer 2 to composer 1 then you can hists below command

Hit command Name: composer self-update --1

Switching Specific Version

if you want to switch specific Versions. then hits below reference command

syntax : composer self-update (version name which you want to switch)

For Example

Hit command -> composer self-update 1.10.22


Hit Command -> composer self-update 2.1.3

Update and Revert Version

if you want to update composer version using command line

you can hit below command

Command Name : composer self-update

if you want to revert install version using command line

you can hit below command

composer self-update --rollback

Preview Version

The command below will allow you to get the pre-released version.

command name : composer self-update --preview

View Current Version 

if you want to check current version

Command name : composer


How to change php version like 7.2 to 7.4 ?

How to change php versions like 7.2 to 7.4 ?

 Important note while change php version one two another

My current php version php 7.2 in terminal

but when i check using phpinfo() function it display php7.4

so the same version setup check below step it's a very useful process for doing this.

step 1
fire this command and change php version php 7.2 to php 7.4
sudo update-alternatives --config php


step2
check php version and restart the apache2
- php -v
-sudo service apache2 restart


step3
enable previous version using a2dimod and a2enmod command and apache2 restart
-sudo a2dismod php7.2
-sudo a2enmod php7.4
-sudo sudo service apache2 restart


step4
check php version in using phpinfo() function and terminal


Tuesday 2 March 2021

How to get pull particular commit id in git and push in git

 Hello 

Please check below step


mkdir -p projectFolder

cd projectFolder

git init

git remote add origin repoUrl

git fetch origin

git reset --hard gitcommitID

this command use when we want to push our rever

git push --force origin master